Homeowners using 3D exterior rendering before building can validate every architectural decision – from facade material selection and fenestration placement to roofline geometry and landscaping integration – before a single foundation pour occurs. This pre-construction photorealistic visualization workflow converts abstract blueprints and schematic design drawings into high-fidelity, spatially accurate digital models, enabling clients to perform iterative design reviews that would otherwise require costly construction-phase change orders. By leveraging BIM-integrated rendering pipelines and real-time lighting simulation, homeowners achieve full design intent confirmation and stakeholder alignment before breaking ground.
Planning a new home is one of the most significant financial and emotional investments a family will ever make. Yet for decades, homeowners had to rely on flat, two-dimensional blueprints and the imagination of their architects to understand what their future home would actually look like. Today, that barrier has been removed entirely.
What is 3D House Exterior Rendering and Why Does It Matter?
3D house exterior rendering is the process of creating a photorealistic digital image or animation of a home’s outer appearance using computer-generated imagery (CGI) and architectural visualization software. These renderings are produced from architectural drawings, CAD files, or BIM models and are textured, lit, and staged to replicate real-world conditions.
For homeowners, these visualizations are far more than decorative images. They are decision-making tools that bridge the gap between architectural intent and physical reality.
According to the American Institute of Architects (AIA), design changes made during the pre-construction phase cost approximately 1% of the project total – compared to up to 10% or more during active construction. This single statistic explains why 3D exterior visualization has become a standard step in the modern residential design workflow.
To understand the full technical scope of what this process involves, the article What Is 3D Exterior House Rendering? provides a comprehensive breakdown of the methods, tools, and deliverables involved.
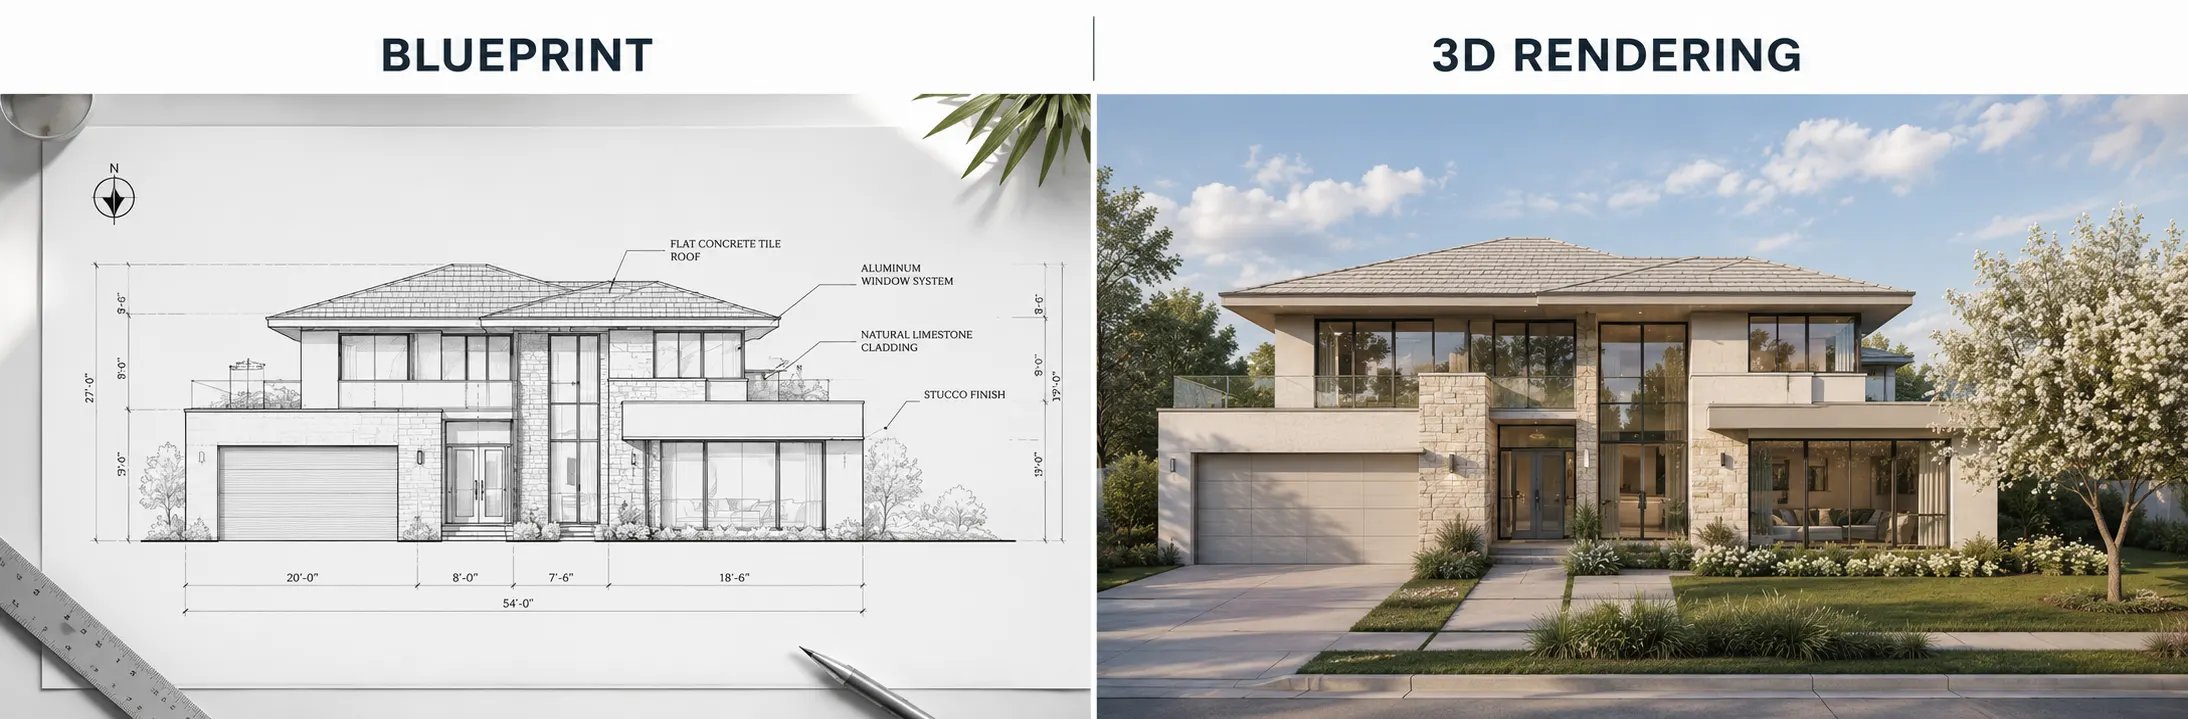
The Core Problem: Why Blueprints Alone Are Not Enough
Traditional 2D construction drawings communicate dimensions and spatial relationships accurately. However, they fail to convey:
- Material textures and surface finishes (brick, stucco, wood cladding, stone veneer)
- Exterior color palette and how it shifts under natural light
- Landscape integration including mature trees, driveways, and hardscaping
- Shadow patterns at different times of day and across seasons
- Curb appeal and neighborhood context
Most homeowners are not trained to read architectural drawings. As a result, they frequently approve designs that do not match their actual vision – and only discover the discrepancy once framing has begun.
3D exterior renderings solve this problem entirely by translating technical documents into visual narratives that any homeowner can evaluate intuitively.
How Homeowners Use 3D Exterior Rendering Before Building: The Full Process
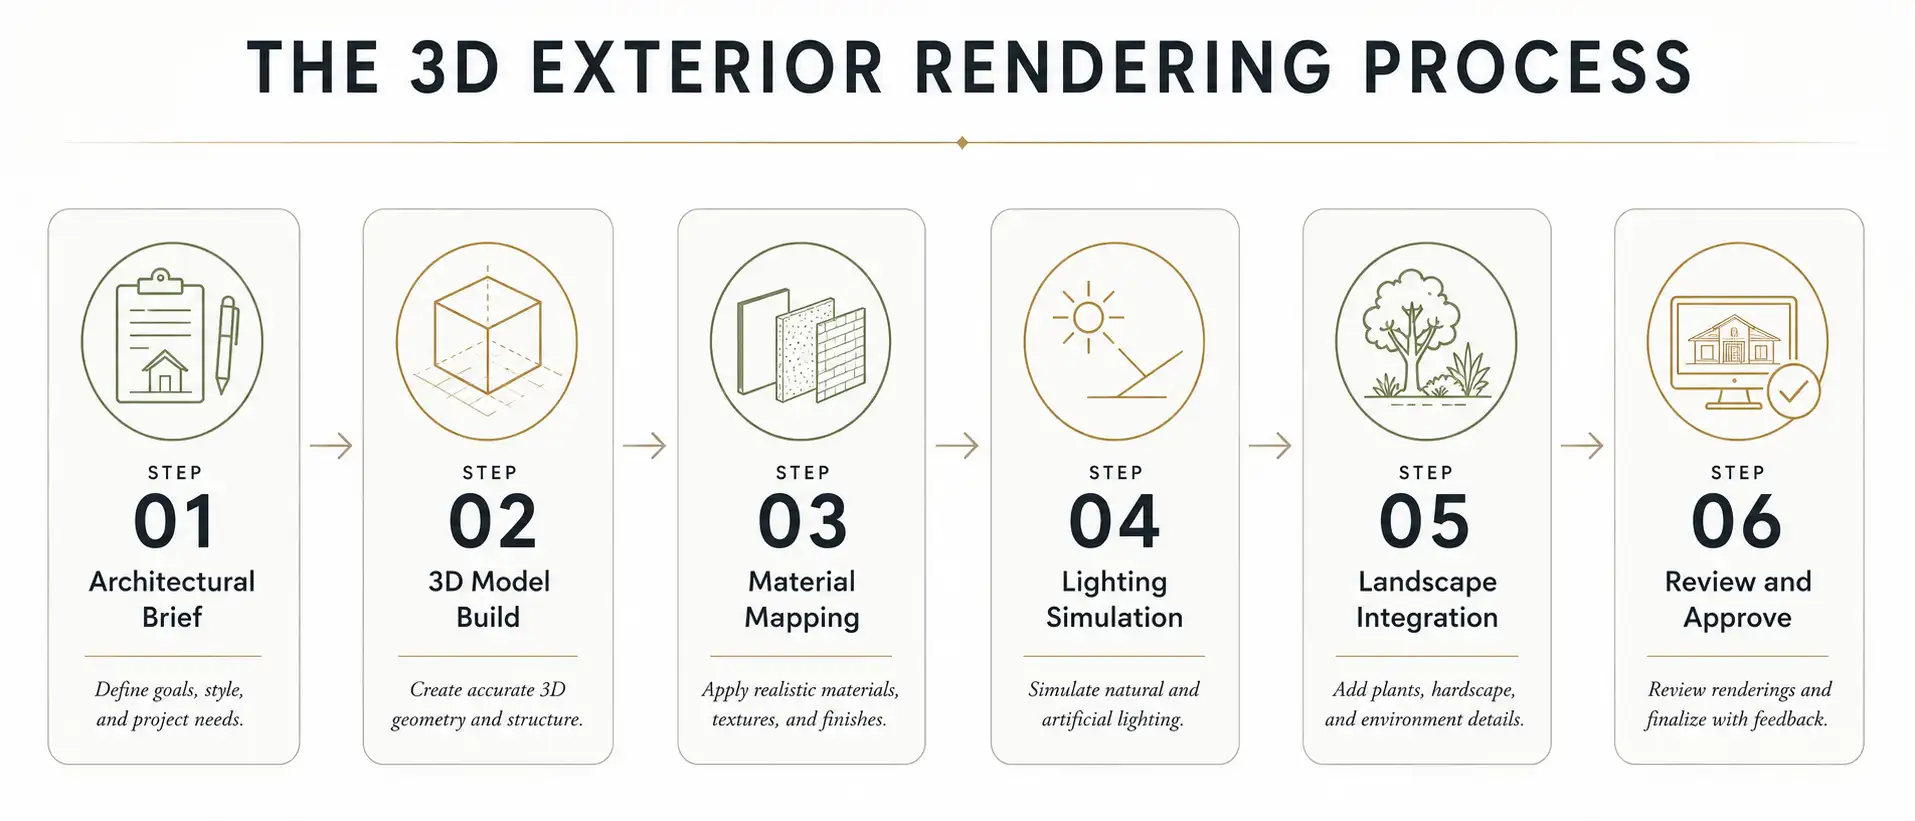
Step 1 – Establish Your Architectural Brief and Reference Materials
Before any rendering work begins, homeowners work with their architect or a professional 3D exterior house rendering company to compile:
- Approved architectural plans (floor plans, elevations, site plans)
- Preferred material specifications (siding type, roofing material, window style)
- Site topography and orientation data
- Reference images from design inspiration boards (Houzz, Pinterest, or architect portfolios)
The more detail provided at this stage, the more accurate and actionable the final rendering will be.
Step 2 – 3D Model Construction from Architectural Drawings
The rendering studio begins by building a three-dimensional geometric model of the home’s exterior using the supplied architectural drawings. This model includes:
- Building envelope geometry (walls, roof planes, overhangs, dormers)
- Fenestration elements (windows, doors, garage openings)
- Architectural detailing (moldings, columns, brackets, fascia boards)
- Site elements (retaining walls, walkways, driveways)
Software platforms commonly used include Autodesk 3ds Max, SketchUp Pro, Revit, and Lumion, combined with rendering engines such as V-Ray, Corona Renderer, or Enscape.
Step 3 – Material Mapping and Surface Texturing
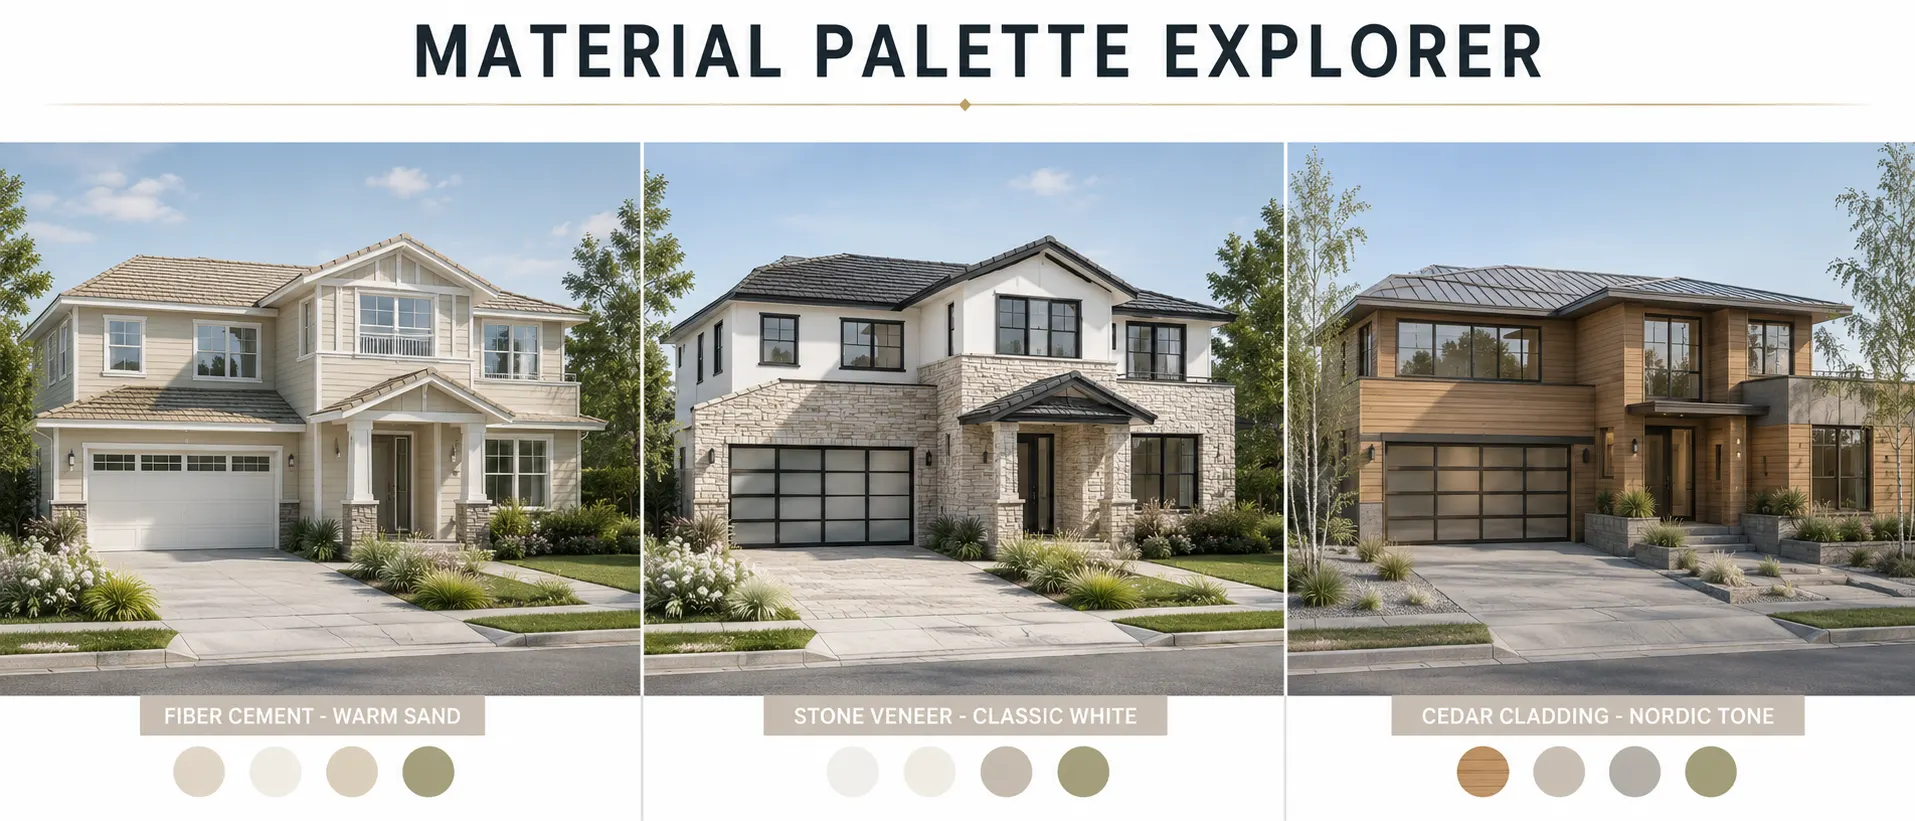
Once the base model is complete, the rendering artist applies photorealistic materials and textures to every surface. This stage directly answers one of the most common homeowner questions: “What will this actually look like?”
During this phase, homeowners can experiment with:
- Different siding materials side by side (fiber cement vs. natural wood vs. vinyl)
- Brick or stone veneer color and pattern variations
- Roof shingle colors (dark charcoal vs. weathered wood vs. slate gray)
- Window frame finishes (white, black, bronze, natural wood)
- Front door color and hardware options
This iterative material review process is where homeowners using 3D exterior rendering before building capture the most value – identifying preferred combinations without purchasing a single sample panel.
Step 4 – Lighting Simulation and Environmental Context

A critical differentiator between basic CGI and professional architectural visualization is accurate lighting simulation. Professional rendering studios configure:
- Sun position based on the site’s geographic coordinates (latitude/longitude) and desired time of day
- Seasonal lighting angles to preview how winter sun shadows differ from summer afternoon light
- Ambient sky models using HDRI environment maps that replicate overcast, golden hour, or midday conditions
- Artificial lighting for dusk and night exterior scenarios (porch lights, pathway lighting, uplighting)
This level of environmental precision allows homeowners to see their home not just as a static object but as a living structure that changes with natural light throughout the day.
Step 5 – Landscape and Site Visualization
The exterior rendering is not complete until the home is placed within a believable and contextually accurate site environment. Professional 3D exterior house rendering services incorporate:
- Mature tree and shrub placement based on the landscape plan
- Lawn, mulch beds, and ground cover texturing
- Hardscape elements including driveways, pathways, patios, and retaining walls
- Neighboring context (adjacent homes, street elements, fences)
- Sky and atmospheric effects
A rendering that omits landscaping and site context gives an incomplete – sometimes misleading – impression of the finished home. Site-accurate visualization is essential for genuine pre-construction decision-making.
Step 6 – Design Review, Revision, and Final Approval
Professional rendering studios deliver an initial draft for client review. Homeowners examine the visualization and provide feedback across multiple categories:
- Massing and proportion – Does the home feel balanced? Are any elements visually overwhelming?
- Material and color satisfaction – Do the chosen finishes achieve the intended aesthetic?
- Architectural detail accuracy – Are decorative elements (columns, shutters, trim) correctly represented?
- Landscape alignment – Does the site look as planned?
Revisions are made digitally within the model – a process that takes hours rather than weeks. Once the homeowner approves the rendering, it becomes a visual specification document that both the architect and the general contractor reference throughout construction.
Key Benefits of 3D Exterior Visualization for Homeowners
| Benefit | Traditional Blueprint Process | With 3D Exterior Rendering |
|---|---|---|
| Design clarity | Low – requires technical literacy | High – photorealistic output anyone can assess |
| Material preview | Sample boards only | Full-scale digital simulation |
| Change cost timing | Expensive if post-construction | Free or low-cost during rendering revision |
| Stakeholder communication | Abstract and open to misinterpretation | Shared visual reference eliminates ambiguity |
| Permit and HOA approval support | Limited visual aids available | Professional-grade images available for submission |
| Emotional confidence before building | Low – reliant on imagination | High – evidence-based decision-making |
The advantages compound when multiple stakeholders are involved. Families making joint decisions, investors evaluating spec homes, and homeowners navigating HOA approval processes all benefit from having a single, authoritative visual reference rather than interpreting drawings independently.
Comparison: 2D Elevation Drawings vs. 3D Exterior Renderings
| Feature | 2D Elevation Drawing | 3D Photorealistic Rendering |
|---|---|---|
| Material texture representation | Line notation only | Full photorealistic texture |
| Lighting and shadow simulation | None | Sun-accurate real-time simulation |
| Landscape and site context | Schematic or absent | Fully realized environment |
| Color accuracy | Requires separate color schedule | Direct visual representation |
| Stakeholder accessibility | Architects and builders only | Accessible to all parties |
| Revision flexibility | Requires redrawing | Digital parametric update |
| Use in marketing or HOA submissions | Limited | Immediately presentation-ready |
Common Mistakes Homeowners Make Without Pre-Construction Visualization
Many homeowners proceed to construction without a 3D exterior rendering and encounter avoidable problems:
1. Approving exterior colors based on small paint chips A color that reads beautifully on a 2-inch paint chip can appear dramatically different across 2,000 square feet of facade. Full-scale digital rendering eliminates this guesswork.
2. Misunderstanding roof pitch and roofline complexity Homeowners frequently underestimate how dramatically a roof pitch affects the home’s visual character. A rendering reveals the actual visual impact of a 4:12 pitch vs. a 10:12 pitch before any framing decisions are locked in.
3. Overlooking window-to-wall ratio Window size and placement decisions made on paper often produce homes that feel either cavernous or bunker-like. Visualizing these proportions pre-construction allows for informed adjustments.
4. Ignoring landscape integration A stunning home placed in a barren or improperly landscaped lot loses significant curb appeal. Pre-construction landscape visualization prevents this common oversight.
5. Approving materials based on showroom samples alone Stone, brick, and wood cladding all change appearance when installed at scale and under variable natural light. Rendering provides accurate at-scale previews.
Expert Tips for Getting the Most From Your 3D Exterior Rendering
Provide Complete and Accurate Source Drawings
The rendering output is only as accurate as the architectural drawings provided. Ensure all elevations, site plans, and material schedules are finalized – or clearly flagged as preliminary – before commissioning rendering work.
Request Multiple Camera Angles
A single front-elevation rendering is a starting point, not a complete visualization. Request:
- Street-level perspective view (the natural line of sight from the curb)
- Aerial or bird’s-eye view (roof and site layout context)
- Corner angle views (showing two facades simultaneously)
- Dusk or twilight rendering (exterior lighting simulation)
Use Rendering Iterations Strategically
Most professional 3D exterior house rendering services include a defined number of revision rounds. Prioritize your feedback efficiently:
- First pass: Evaluate overall massing, proportions, and site placement
- Second pass: Refine material palette and color combinations
- Third pass: Finalize architectural details and landscaping
Share the Rendering With Your Builder Early
Once approved, the exterior rendering should be distributed to your general contractor and all relevant subcontractors. It reduces on-site ambiguity, prevents material substitution errors, and ensures that the finished home matches the approved visual specification.
Explore Animation and 360-Degree Walkarounds
For complex or high-investment residential projects, consider requesting a rendered animation or interactive 360-degree exterior walkthrough. These deliverables offer spatial context that static images cannot replicate and are particularly valuable for presentations to family members, lenders, or HOA review boards.
Research from the National Association of Home Builders (NAHB) consistently highlights that pre-construction visualization tools improve client satisfaction scores and reduce post-construction dispute rates.
Frequently Asked Questions (FAQ)
What does “homeowners using 3D exterior rendering before building” actually mean?
It refers to the practice of commissioning a photorealistic CGI visualization of a home’s exterior – based on approved architectural drawings – before any physical construction begins. The rendering allows homeowners to evaluate design decisions, material selections, and site context in a visual format that is accessible, accurate, and fully revisable at minimal cost.
How accurate are 3D exterior house renderings?
Professional-grade architectural renderings produced by experienced studios are highly accurate when supplied with complete and precise architectural drawings. Material textures, color values, shadow behavior, and proportional relationships are all simulated with a fidelity that closely replicates the finished structure. The accuracy is directly proportional to the quality and completeness of the source drawings.
How long does it take to produce a 3D exterior house rendering?
Timelines vary based on project complexity, the number of camera angles requested, and the current workload of the rendering studio. For a standard single-family residential project, expect a turnaround of approximately 3 to 7 business days for initial delivery, with revision rounds adding 1 to 3 days each. Complex or custom architectural projects may require longer lead times.
Can homeowners change materials and colors after seeing the initial rendering?
Yes. This is one of the primary advantages of 3D exterior rendering for homeowners. Material changes, color palette revisions, and architectural detail adjustments can all be made digitally within the 3D model. Each revision is applied parametrically and a new rendering is produced – without any physical rework costs.
Is 3D exterior rendering only for new construction?
No. Homeowners undertaking major exterior renovations, re-siding projects, roof replacements, or landscape redesigns also commission 3D exterior renderings to evaluate their options before committing. The process is equally applicable to any project where an accurate pre-construction visual would inform better decision-making.
How much do 3D exterior house rendering services typically cost?
Pricing varies based on project scope, the number of views requested, and the level of photorealistic detail required. Entry-level exterior renderings for straightforward residential projects begin at a few hundred dollars per view, while premium full-environment visualizations with multiple camera angles, landscape staging, and lighting variations represent a larger but highly justified investment relative to the overall construction budget.
Do I need to provide architectural drawings to get a 3D exterior rendering?
Yes. Accurate architectural drawings – at minimum, all four building elevations and a site plan – are required to produce a geometrically accurate rendering. Some studios can work from rough sketches or reference images for early-stage conceptual visualization, but final construction-ready renderings require complete and dimensionally accurate source documents.

See It Before You Build It
The decision to invest in pre-construction 3D exterior visualization is not a luxury – it is a form of risk management. Homeowners using 3D exterior rendering before building gain something that no blueprint, mood board, or paint chip can provide: a photorealistic, spatially accurate, fully revisable view of their future home before a single dollar of construction cost has been committed.
From material selection and color palette finalization to roofline geometry validation and landscape integration review, the 3D rendering process compresses weeks of design uncertainty into a focused, iterative visual workflow. It protects homeowners from expensive construction-phase changes, strengthens communication with architects and builders, and – perhaps most importantly – delivers the confidence that comes from knowing exactly what you are building before you build it.
If you are planning a new residential build or a major exterior renovation and want to see your home before it exists, now is the time to act. Partner with a professional 3D exterior rendering team that combines technical precision with photorealistic artistry to deliver visualizations that move your project forward with clarity and confidence.